There's something about a simple, lightly adorned coffee cake. Its grown-up dark bitterness seems to command attention more maturely than any chocolate cake, and the essential addition of walnuts adds some great crunch. These make the cake a highly, highly sophisticated proposition, suitable even for coffee-phobes (like myself). That isn't it's only advantage: baking this in a loaf cake (although this mixture would be great for baking in two round tins and sandwiching in coffee buttercream, but don't drench to cakes so heavily in syrup or you could forgo the syrup althogether with rich buttercream around) makes it far more suitable for travel, and it is a great excuse for buying the wonderful camp coffee extract. If you can't find it, use some very strong coffee made with instant granules, or indeed real coffee.
1)Preheat the oven to 175 degrees Celsius. Take 200g unsalted butter and 125g cream cheese out of the fridge to soften (and 3 eggs if you keep them in the fridge) , and line a loaf tin with greased foil or baking parchment spritzed lightly with spray oil or melted butter.
2)Beat the butter and cream cheese with 200g plain flour, 225g golden caster or light muscovado sugar, 3 tbsp camp coffee essence, 2 tsp ground coffee beans, 2 tsp baking powder, 3 eggs and 2 tsp vanilla extract. When entirely smooth and light, fold in 150g chopped walnuts, then slowly beat in 100ml hot water, to loosen the batter.
3)Pour into the tin and bake for about 40 minutes, until a skewer inserted comes out clean. In the meantime, prepare a coffee syrup to drench the cake in. Dissolve 200g brown sugar into 100ml water, then add 2 tsp instant coffee granules. Bring to the boil and bravely let it burn, until thick and treacly.
4)Remove the cake and immediately pierce it with a piece of raw spaghetti (or a fine skewer if you're basic) and then soak ALL, yes all, of the syrup through the sponge. Sprinkle with crunchy demarara sugar. Leave to cool before slicing, or packaging and taxiing.

Thursday, 23 June 2016
Friday, 17 June 2016
Chocolate Pasta
Such a waste, such a terrible, terrible waste. I made a huge vat of this gleaming, leathery pasta and it happened to go even more successfully than when I've ever made regular fresh pasta before, but the issue is it is undeniably heavy and difficult to dress with an appropriate sauce.
The point of this is not sweetness, it is far more intriguing as an eater for this pasta to be savoury and bitter, but with enough chocolate flavour to carry it into sweeter territory. However, don't let that put you off- this pasta would work wonderfully with a sharp salty cheese or tomato sauce. I used custard (looking back on my awful mistake) and it turned into a nasty, sloppy, separated mess. Almost the entire pan went to waste, and that was undeniably painful.
If you choose to make this, bare that and a few more things in mind- the cocoa hinders the gluten in the flour (which just must be '00') so it is more difficult to knead and work with, but after resting you will find that the dough goes very smoothly through the pasta rollers. I have a post about fresh pasta already, so I won't bore you with the details, but in my opinion, resting and a good, patient roller are the keys to successful fresh pasta.
1)On a worktop or a food processor, blitz 400g '00' flour, a pinch of salt, 4 eggs, a few tablespoons of water (obviously you will have to be flexible with the amounts of water) and 30g really good cocoa powder. When you reach a crumbly dough, transfer to a floured work surface and knead until very smooth and elastic. Divide into two pieces and wrap in clingfilm. Leave to rest for at least 30 minutes.
2)Cut each piece into two, then flatten with your hand then roll in your pasta roller, 1 setting at a time until it is 9 thin. Hang over your work surface, dry until leathery then cut in the tagliatelle cutters.
3)Leave to dry in little nests wrapped around your wrists (or a coat hanger) in semolina then cook in boiling salted water for just about 3 minutes, until al dente.
4)Dress at your own peril...
Friday, 10 June 2016
Soda Water Scones
It doesn't seem too feasible for baking to be a type of cooking that can be considered super speedy- but scones are one of the few, and that's just regular ones. These however take the piss ever so slightly by being just three ingredients, and can probably be done with just a bit of extra spring in 15 minutes.
These scones don't need extra sugar, but if you wanted a bit of extra flavour and sweetness use lemonade as opposed to soda water. Bare in mind scones typically aren't sweet of themselves, it's what you spread them with that counts.
1)Combine 300g self raising flour with a pinch of salt and then pour in 150ml each double cream and soda water (make sure it's not flat) mix gently to a soft dough (you can add some sultanas at this stage if you like).
2)Pat it down to a thickness of a few inches and cut out rounds with a cutter- or just cut rectangles or triangles with a butter knife. Place on a baking sheet and glaze with milk then optionally sprinkle with demerara sugar.
3)Transfer to a preheated 180 degree oven and bake for about 10-12 minutes until quite golden but do them slightly less than you'd think they need, just to keep their belly nice and tender and not dry.

Friday, 3 June 2016
Mussels with Chorizo
Unfortunately, this dish is plagued with being totally in fashion. Retro food like moules mariniere is coming right back in, and it seems the incrediblye flavour and versatility of chorizo has long stopped being a secret. But whatever, this is a meal you so want to eat.
1)Mussels have a few rules before cooking: they have to be scrubbed very well (although those little baby shell parasites on them will not come off) and the seaweed feather beard that drifts after each mussel also needs to be ripped off (this is known as debearding). If they remain open at this stage, and don't close after rapping the shell with the side of the sink, they should be chucked. Soak them in the sink for a good while to clear out any grit.
2)Finely slice 3 cloves garlic and 2 small onions or one large one. Slice 200g chorizo into nice slices and cook in a large pan with a little butter until their fat renders out. Cook the onions and garlic in this fat until they're soft and sweet.
3)Make a broth by adding 2 tsp harissa paste, 1 tin of tomatoes and water filled to the brim of the empty can, and 1 1/2 glasses white wine or dry sherry. Bring to the boil, then clamp on a lid and simmer until the bitterness of the wine cooks out.
4)This broth can be kept warm until whenever you need to cook the mussels. It's best to do that between the starter and main course as you don't want cooked seafood sitting around. Bring back up to the boil and throw in your cleaned mussels. Clamp on the lid and steam until they open up, but don't overcook them. It may take 3-5 minutes. Also, any fish that remain closed now should be chucked. Top with freshly chopped parsley, and serve.
Thursday, 2 June 2016
Vietnamese Spring Rolls 2.0 with Soy-Peanut Dipping Sauce
I've attempted these rolls perhaps 3 or 4 times before, never to much success. After my blog's revamping last year, I made these to accompany a Thai noodle soup (which I do still make), a slight clash of cultures but whatever, they were pretty damn awful. Somehow, I failed to dream up the concept of actually seasoning the rolls, and then after watching a fabulous video of Gordon Ramsay preparing them, I was given a new view. You prepare a noodle salad, a meal of itself, then simply use just that as your filling. Correct, you sacrifice the neat little layers of colour peaking through the translucent rice paper for one big colourful mass, but the taste is oh so superior.
1)Cook 200g bean thread noodles in boiling water and leave to soak until tender.
2)Prepare a dipping sauce by mixing 3 tbsp soy sauce and 3 of rice vinegar with a thinly sliced garlic clove, one chilli with the seeds in, a little sugar, a tiny drizzle toasted sesame oil, 2 fat tbsp peanut butter and whisk it all up with enough water to make a pourable sauce. Leave to chill whilst you prepare the filling.
3)Drain the noodles and season with 2 tbsp fish sauce and the juice of half a lime, then grate 2 peeled carrots, shred a head of romaine lettuce and finely chop the bizarre combination of a bunch of coriander, a bunch of basil and really just half a bunch of mint as it has the most potent flavour of the three. Add 2 finely chopped spring onions to this salad and toss it all together with the oodles of noodles.
4)Soak rice paper wrappers in hot water until soft and pliable, then dabble a little water on the surface you plan to roll them on. Place a small bit of filling on the side towards you, then fold the rice paper over the filling tightly, and roll, tucking the sides at a right angle to you in as you finish the roll. Keep going until you have enough rolls to serve and enough leftover salad to pick at in the fridge.
5)Having a pyramid of rolls is nice to serve, but they can stick together so use circles of greaseproof paper between each layer. Serve to a crowd unafraid of the messy quality that is making and eating these.
Wednesday, 1 June 2016
Arancini
This is it, one of the world's best leftover recipes. Unlike regular rice, leftover risotto is a bit exclusive- not nice reheated, but far too claggy and congealed to eat cold. Therefore, the clever Sicilians utilised this robust quality of leftover risotto to make these little golden balls (or rather orange hence their name translating as 'little oranges' in Italian), which are risotto encasing a cube of mozzarella coated in seasoned breadcrumbs (panko for preference).
All you need for this is 1 bag of small mozzarella cherries or bocconcini per 1 serving leftover risotto, a bowl of flour, an egg beaten with some salt and a bowl of panko. Encase an egg of mozzarella in risotto, by flattening about a tbsp of risotto, pressing it around the cheese and then placing more over the exposed cheese. Don't roll them, compress them in your palm until relatively firm and stable (it's pretty difficult to get these really neat). Toss in flour, egg, then breadcrumbs and then deep fry in very hot vegetable oil until golden and crispy and the mozzarella is gooey, or like 'telephone cords' as the Romans describe it.
Tuesday, 31 May 2016
Risotto alla Milanese
'Roast Chicken And Other Stories' by Simon Hopkinson is one of the loveliest, most informative and useful cook books you may ever read. I flicked through the book and when it came to the saffron chapter I saw this iconic dish- risotto alla Milanese. It is simply risotto tinted with the fabulous colour and musky flavour of saffron.
Hopkinson makes it by precooking the rice all in one, saving us from the boring ladelling of stock one after the other- I sympathise with this highly, and normally make my risotto all in one in the oven, but this method is useful for getting ahead as the rice can be kept cold until needed at its precooked stage.
This makes a lot for just 4, and it is very rich, but that's desirable as there's something magical you can do with the leftovers...
A final note, traditional recipes use bone marrow from any kind of meat, usually beef. If you wanted to you could replace some of the butter in the second stage with it if it's easily accessible at your local butcher.
1)Infuse 2 tsp saffron threads in 1 tbsp hot water. Leave whilst you continue with the rest.
1)Finely chop three small onions, or two larger ones and fry gently in 100g butter in a saucepan suitable for serving (you don't change cooking and serving platforms) until soft and slightly caramelised. This can take a good 15 minutes. Add 400g arborio rice and stir until the rice is coated. If it appears too dry, add more butter. Then, add 600ml strong chicken stock and the saffron and water and stir in. Make about a litre of stock, as you need more later.
2)Bring to a steady boil, then switch off the heat and clamp on a tight lid. Leave, not peaking once, for 30 minutes.
3)After that, the rice will still be hard and dry. Don't panic, from here on in you apply heavy heat and add enough stock so the rice becomes thinner, volcanic even and just tender. You want it more the texture of all dente pasta than rice pudding.
4)Add some more butter and some grated parmesan, or my new discovery pecorino (more creamy and less salty than parmesan) until glossy and just delicious. Serve to an awaiting table.
Blue Bearnaise Steak with French Fries
This is pure sophistication, and possibly one of the best meals I've ever cooked. A thin, rare steak crusted with crunchy salt and pepper corns, an elegant buttery sauce to douse everything in, and crunchy chips to stop everything getting too misty-eyed. However, delicious though this is, you are entering restaurant territory at home, and that is always a treacherous area. The main issue with recreating a dish that seems so at home in a posh French restaurant is that you find yourself disappointed with the lack of efficiency and perfection. It feels like this dish should be turned out one after the other, each plate identical and piping hot, but that is near enough impossible to create in your own kitchen. You will have to come to terms with the food being slightly lukewarm (to try and rectify this you can heat the plates in a warm oven before serving) as you need a restaurant kitchen-sized amount of hands to have everything made simultaneously so it all remains hot. This isn't a problem, this is quite a summery dish, and sort of evokes a cooling barbecue, where the delicious juicy steaks leach their heat in the breeze. Talking of steak, the variety you have is up to you- I tend to go fairly basic and have rump, better than sirloin and slightly more tender, but if you feel like being a bit more adventurous have the chewy skirt or muscular filet mignon.
For the chips, I've tried to cut out as much faff as possible by cutting these super finely in the food processor so they don't need twice frying. Thick cut chips require twice frying, once to cook them through and the second to crisp up the outside, these French (or rather Belgian) fries cook much faster so all you need to do is cook them in oil over a low heat, then ramp up the temperature to get them crispy and golden. If you want to forgo the chips do, and just have some good bread alongside.
1)Take about 1 kilo of red skin potatoes, unpeeled, and either chop them very finely yourself or send them through the coarse chopping attachment on a food processor (often called julienne). Pat them dry with kitchen paper then leave them in the fridge whilst you prepare the sauce.
2)Bearnaise is made the same way as hollandaise, but I don't bother to make a vinegar reduction or infuse it with only half a shallot. Simply take 4 egg yolks (freeze the whites in plastic bags) add 1 tbsp dried tarragon, the finely chopped white and light green parts of 3 spring onions, and 2 tbsp white wine vinegar. Take a pan of gently but insistently simmering water and place the bowl containing the egg yolks etc over it. Have on hand a bowl of iced water to dunk the bowl in if the sauce overheats, plus 200g unsalted butter melted and cooled slightly. Whisk just like mayonnaise, starting with a steady tiny flow of butter then slowly up the amount going into the egg yolks when the sauce is hot and stable. If the sauce thickens too fast and looks like it's splitting, throw in more butter to dilute it and bring the temperature down and, just to be safe, dunk in the ice bath briefly. When all the butter is incorporated, take off the heat, and whisk in a little salt and white pepper, to taste. Also bung in a finely chopped bunch of fresh tarragon. Leave to cool.
3)Using a heavy duty frying pan or a wok, heat some vegetable oil (about 2 pints) over the lowest heat, when the oil makes a chip bubble gently, throw a handful in and leave for about 4 minutes, until they seem to curl and feel soft when you take one out to taste. Increase the heat until the chips sizzle fiercely and go golden, then lift out with a chip basket or tongs (I have one of those Asian ladels that look a bit like a rustic, flat colander). Serve in newspaper in a basket, or whatever your heart desires. Continue until all batches are done, then move onto steak.
4)Cover 4 steaks in clingfilm, then bash them with a meat tenderiser until about an inch thick. Cover in good olive oil and coarsely ground salt and pepper.
5)Have a griddle or frying pan smoking hot and ungreased before the meat goes on, then cook the steaks very briefly. I like it so rare it nearly has a pulse and this happens to be called blue, so I cook them for barely 30 seconds a side. Wrap in foil to rest before serving with the chips and sauce.

Saturday, 28 May 2016
New York Pancakes
It has to be said, (sorry England) that America may make the best pancakes of the Earth. More specifically, New York; I was lucky enough to travel to the city that never sleeps in 2012 at Christmas, and of all the meals we had there (of course we sampled many) breakfast was the most delectable- plates stacked unfathomably high with fluffy pancakes, even coming in the trendy red velvet variety and of course not forgetting blueberries and bacon. As a result, I felt it my duty (given that I can't actually successfully make English pancakes) to recreate the puffy pancakes at home.
Haha, now that it comes to actually writing this recipe, I realise all that boastful nostalgia was fairly unnecessary. These pancakes I make so frequently actually have very little to do with New York, the reason that I named them so was because part of their foundation is cream cheese and vanilla and of course I thought of the world famous New York cheesecake. The ending result is a tangy, light and not too sweet concoction and featuring a task that you may not consider morning work- separating eggs.
I promise you, I've tried and tried to make these without including flour, because wouldn't gluten free cheesecake pan cakes be so of the moment? Unfortunately, without the flour these don't have enough structure to cook into cakes, and the whipped egg whites without flour make a nasty scrambled egg texture. I'm sincerely sorry.
I don't often serve with this syrup, instead I like to macerate berries with balsamic vinegar and a tiny bit of sugar until they go into a chunky sauce, perfect for dumping over the cakes. This is achieved very easily with a handful of strawberries that you behead then roughly chop, then allow them to macerate with about 1/4 cap balsamic vinegar and 1/2-1 tsp caster sugar (it depends on the sweetness of the berries). Leave these in a covered bowl before you start making the pancakes so they have time to macerate, and the powers of osmosis will slick the berries in a glossy red glaze. Another option is some sour cherries, thawed frozen ones or ones out of a jar, or do a bit of morning dismemberment and destone and pull apart some shiny fresh cherries by hand. Chop these up with scissors then steep in some vanilla sugar, again before you prepare the pancakes.
1)Stir together 150g cream cheese, with 3 tbsp natural yoghurt or sour cream, 3 tbsp vanilla sugar, 4 tbsp plain flour and three egg yolks.
2)Leave the remaining 3 egg whites in another greaseproof bowl and whisk them very well, by hand because if I can manage it you certainly can, until stiff.
3)Stir about a third of the whites into the cream cheese mixture to lighten it, then fold the rest in until very smooth.
4)Using an ungreased, non stick frying pan, dollop small spoonfuls of the mixture in. Wait until the bubbles around the pancake set, then flip confidently. Give another minute or so on the other side, then do the next batch.
5)Serve with syrup, or the fruits prepared as above.
Tuesday, 24 May 2016
Fish Cakes with Hollandaise Sauce
Delicious though mashed potatoes are, once they cool and enter the fridge they become riddled with some kind of curse. You will never reheat them to their original glory.
However, mashed potatoes are extensively useful as a leftover ingredient. You could make a loaf of hearty German potato bread, or, even better, fish cakes and (admittedly not really using leftovers) fresh hollandaise sauce- easier than you think.
1)There's no point providing a measurement for the mashed potato as they're leftover, but think about 2 cans for every 2 servings of mashed potato, which requires one egg to bind (so you can't use much less of either fish or potato) I use cat food heaven in the form of tinned salmon, but tuna would also be good. To help the mashed potato come back to life if you're just using plain old boiled potatoes then add a little melted butter and milk. To the mash and fish, season with plenty of salt and pepper, and add the zest of half a lemon, 2 finely chopped spring onions, a pinch of chilli powder (optional), 2 tbsp finely chopped parsley and about 2 tbsp capers. To work as a binding agent, add one egg. The mixture should be soft and sticky but you still need to be able to form it into patties.
2)(you guessed it) form the mixture into fairly small patties and leave in the fridge to firm up before cooking on a baking sheet that you lined with clingfilm before you started. I should tell you that I nearly always make 5 out of these for some reason, but this of course depends on how big you make them.
3)This is a good time to start the hollandaise. It sounds like a nightmarish task, cooking egg yolks over a pan of simmering water, and yes, I can't promise it will never curdle, but I can promise that provided you're vigilant, have an insistent but gentle heat under the eggs and prepare for overcooking by having a bowl of iced water beside for dipping, then your hollandaise will work. And if it still doesn't, then quietly discard it and have the fish cakes with ketchup- no one has to know. The worst thing you can do is attempt this fearfully; that's condemning the sauce to curdle before you begin. You need to start by infusing 2 tbsp white wine vinegar with some cheat shortcuts. Traditionally, mace is used which is, I suppose, the shell of nutmeg; I can't get hold of it, so I use the old leavings of a nutmeg when they're too small to continue grating. Place it in a small pan with the vinegar, a few peppercorns, a bruised spring onion and a bay leaf. Heat gently until slightly reduced, then transfer to a heatproof bowl that contains 3 egg yolks (freeze the whites in a bag for meringue etc). Melt and cool 150g unsalted butter and transfer to a jug. Place the bowl over a pan of gently simmering water, but don't let the water touch the base of the bowl and start pouring the butter into the egg yolks, whisking constantly with a very slow stream just like mayonnaise. When most of it has been absorbed you can pour in the butter with a less delicate wrist. If the mixture splits, you may find upping the heat can help everything emulsify again, or it's too hot and needs to be dipped into a bowl of iced water. Remove from the heat when fully cooked, then add a very small squeeze of lemon that you zested before and a pinch of salt and white pepper. Set aside to come down to room temperature while you coat and cook the fish cakes.
4)You could use breadcrumbs or, even better, panko for this if you have them on hand, but if not coat the fishcakes in raw polenta. Fry them until crispy in a thin layer of oil to prevent burning. Serve with a crisp salad and the sauce.

Monday, 16 May 2016
Superb Carrot Cake
A very old book of my family's- Fast Cakes by Mary Berry, proved vital in providing the world (all 0.00002% of it that read this blog) with one of the best carrot cakes you may ever make. I know that's a horribly immodest thing to say, but this cake, as subtle and elegant as is it bold and brass, is one of the best things Mary-Berry/adapted America can offer.
To adorn this cake I went very kitsch and made some carrots out of sugar paste dyed green and orange. Just mould them into a carrot shape, add a tuft of green and finish with scored lines. But you definitely needn't bother. Although, since some walnut halves dotted over the cream cheese frosting is slightly less vulgar...
1)Grease a small but tall cake tin with butter and a circle of greaseproof paper, buttering over that too. Preheat the oven to 170 degrees.
2)Grate about 150g worth carrot. Since you don't need to peel them, you just need to weigh them whole and factor in about 15g for the tops and tails. It's best not to do this in a processor as this makes them a little too wet.
3)In a large bowl combine 225g self-raising flour, 2 tsp baking powder, 2 tsp ground cinnamon and a good grate of fresh nutmeg. Mix in the carrots, 3 mashed bananas, 50g walnut pieces (this is the cheap way to buy them, as broken) and 150g soft light brown sugar. Crack a hole in the centre and beat in 2 eggs and 150ml flavourless vegetable oil until smooth. Just before pouring into the tin, loosen the batter with 2 tbsp water from a recently boiled kettle.
3)Bake for about 1 hour, checking at 40 minutes with a skewer that will come out clean once baked. Leave the cake to cool in the tin for about 5 minutes before turning out, flipping out of the tin, removing the paper and setting over a wire rack to cool the right way round.
4)To make a frosting, beat 75g soft butter, soft cream cheese (all at room temperature) and 175g icing sugar together in a bowl until light and fluffy. Using a large palette knife, ice the top of the cake with swirls and peaks. If desired, add some sugar carrots and walnut halves.


 I couldn't decide which one to post so I put them all on :)
Saturday, 14 May 2016
Chocolate-Chip Zucchini Bread
If you feel immediately alienated by the title, then call this courgette loaf cake (zucchini being the charming American name for courgette). If you're further alienated by the addition of a vegetable in a cake, either ignore it's there, or be reminded that vegetation in a cake isn'the unheard of- throughout wartime bakers used their natural sweetness in place of the unavailable sugar and that idea still exists today, granted in a more glamorous fashion, in the form of carrot cake. Finding courgettes rather than carrots odd to be baking with is a result simply of the time.
Essentially, this is just a rehash of my banana bread recipe, the main difference being that chocolate plays a more important role here- the cake is studded with melting nuggets of cocoa instead of sticky sultanas.
1)Preheat the oven to 180 degrees Celsius and grease a loaf tin with butter or vegetable oil and dust generously with sifted cocoa powder.
2)Grate 2 small or about 1 3/4 larger courgettes, and don't hold back, grate the whole thing.
3)Combine 200g plain flour, 1 tsp ground cinnamon, and 1 tsp baking powder and bicarbonate of soda (baking soda).
4)In a larger bowl whisk 2 eggs, 220g light brown sugar together until light and well aerated, then incorporate gradually 120ml flavourless vegetable oil (sunflower, groundnut etc, for example) and 1 tsp vanilla extract or bean paste then finally your courgettes.
5)Fold in the dry ingredients until throughly combined, then add 150g dark chocolate chips. Transfer to the loaf tin and bake for a good 40 minutes- 1 hour until a skewer inserted into the thickest part of the loaf comes out clean. Leave to cool for about 5 minutes in the tin before transferring to a wire rack to cool completely. Although there is plenty to be said for having this hot...
Sunday, 8 May 2016
Amarula Cheesecake
Perhaps I'm getting back into baking. Perhaps not everything I bake from now on will look like it's been dropped from a height. However, even when cake-making was my foremost passion, I'd never, ever, think to bother with baking a cheesecake. The water bath, the surface cracking, the eggs, the weird method of cooling; why not just bung it in the fridge? Well, it's a fair argument, but this wasn't difficult, not at all. With a food processor, a large pan, and a nifty spring form tin, I made a decent baked cheesecake; maybe you could make a great one?
I don't know if you've seen my latest tiramisu recipe, but if you have you will notice the common ingredient- the beguiling South African liqueur called Amarula- it's a sweet cream liqueur, with a slight spicy-cinnamon vibe to it that works divinely in a smooth creamy dessert. I continued the theme from my tiramisu, thereby included toasted Brazil nuts in the buttery biscuit base and a pinch of cinnamon to offer the crumb a mighty sun tan.
If you can't get Amarula, you may substitute Bailey's but Amarula is the only cream liqueur Bailey's has outsold and is thus very accessible, and oddly cheap.
1)Preheat the oven to 200 degrees Celsius.
2)In a dry frying pan (you may as well use the tin you cook the cheesecake in its water bath in) toast 100g chopped Brazil Nuts until golden and aromatic, then obliterate in a food processor with 250g digestive biscuits and 2 tsp ground cinnamon. Once they're sandy and fine, pour 100g melted unsalted butter down the funnel and continue to mix until the mixture starts clumping. Spread evenly over the base of a spring form tin around 20cm in diameter because I like a wide thin cheesecake not a doorstop thick one but it's up to you.
3)Have everything at room temperature for at least an hour before you begin. Separate 6 eggs, dropping the whites into a glass lined with a freezer bag and (surprise surprise) freeze them for future use. Place in the food processor which has been thoroughly cleaned, along with 625g cream cheese, 150ml sour cream, 225g caster sugar, 20g cornflour, 2 whole eggs, 1 tsp vanilla extract or bean paste and 200ml Amarula liqueur. Blend on low speed until everything is just combined. The objective here is to mix everything thoroughly but not beat in air, obviously some will be beaten in as it's unavoidable but if you airate everything it will rise and crack as it falls again. You could also use a stand mixer (you lucky bastard) but use the paddle attachment, not the whisk and again, low speed. Before filling the tin wrap the tin with tin foil and then clingfilm to ensure no leakage occurs. Pour the liquid batter into the prepared tin and allow it to settle so you can pop any large bubbles with a skewer. Pour the batter in a pan larger than the tin itself, I used my paella pan of course giving you an excuse to make my paella.
4)Place the tin within the pan in the open oven with the drawer out and carefully pour boiling water around the cheesecake about halfway up the tin. Shut the door and turn the heat down to a very low 160 and bake for 45 minutes to an hour until set, but slightly wobbly in the middle. Allow the same principle as a baked custard, such as creme brulee.
5)When cooked, prop the oven door open just a crack with something like oven gloves and leave to cool entirely like that. When cool, leave in the fridge until you're ready to serve.

Wednesday, 4 May 2016
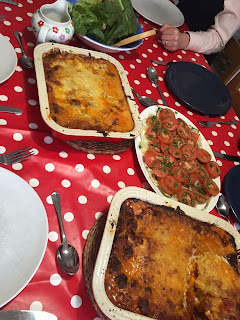
Meatball Lasagne al forno
I'm willing to accept cooking inspiration from anywhere, and this may be my most eclectic so far. First of all, I was watching a very 70s Mary Berry cooking show where she made a delicious lasagne al forno (as it was called back then, it just means lasagne in the oven in Italian) and the recipe was rife with money and time saving tips. I decided to keep many of them as it is so lovely to make such a homespun and retro dish like lasagne- even for a dinner party.
The second trip down YouTube way bought my second variation on the lasagne. I was watching a buzz feed video of Italian women satisfyingly criticising the American-Italian restaurant chain Olive Garden. One woman's review of the lasagne explained that her way included arduous layering and the intruguing idea of small meatballs. I thought this was a lovely little tweak, and adopted for my own. Thank you very much, 'Italian Grandma'.
To serve with this, I make two salads: thinly slice two large white or candy red onions along with 6 medium tomatoes or 4 big beef ones and macerate them in 300ml virgin olive oil, the juice of 1 lemon, salt and finely chopped parsley then arrange on a dish. For the second it's just lettuce with a dressing made on the side (allow guests to serve their own dressing) that's loosely based on a Caeser salad, being garlic infused oil, dijon mustard, Worcestershire sauce and cider vinegar.
Do also note that the meatballs paddling in their rich sauce makes for a great a companion with a steaming bowl of tagliatelle or linguine.
1)Finely chop 3 large white onions and 3 sticks of celery, saute 3/4 in olive oil and set the rest aside for meatballs. Add 6 garlic cloves to that, and an easy way of doing this is putting the whole clove in a garlic crusher, unpeeled and squeezing the juice out one at a a time. Or just blitz all of the above in a processor. When nice and soft, add a good 3 tbsp tomato puree, 1 tbsp oregano, 3 tins of tomatoes remembering to swill them about halfway with water, a beef stock cube, 3 tbsp redcurrant jelly or another sour jam, a pinch or more of dried chilli flakes and a good few shakes of Worcestershire sauce. Let simmer for a good while, tasting, adding salt pepper and sugar until it's right for you, then simmer gently whilst you make the meatballs.
2)Add 1k minced beef to the set aside onions and celery and add lots of salt and pepper, grated parmesan, dried oregano, Worcestershire sauce, 2 eggs and 3 tbsp or so semolina or decent breadcrumbs. Don't be hung up on quantities here, just go by the idea that you need less of everything than you think. Make tiny meatballs out of this, really no bigger than a tsp then plop them gently into the sauce. Vary this mixture how you like, minced lamb works here but you could sprinkle some dried mint in, or use sausage meat and beef or plonk a bit of veal in- generally, if it's minced it's suitable. They only need a short precook. If you have some time that should be spent doing something useful, make more meatballs and freeze them on a tray before transferring to plastic bags, they need no thawing before you plop them in their hot tomato jacuzzi.
3)For the cheese sauce set the milk to heat early as then the whole sauce cooks and thickens faster. However, it may be more runny than you think it needs as I don't precook the lasagne , I use the liquid from the sauce to do it whilst it's in the oven. Heat 2 pints of milk and infuse with a rind of parmesan, if you don't have one just remember to keep them in future and store in the freezer. In the meantime, combine 50g butter and 3 tbsp flour, a pinch of white pepper and mustard powder over low heat and then gradually add the milk and cook until the thickness of single cream, then add a good grate of fresh nutmeg. Stir constantly and have over a low heat. Take off the heat and stir in a mix of really nice cheeses, use predominantly a strong cheddar but for flavour add Swiss cheese and even blue and soft cheese.
4)To assemble the lasagne (this makes two) go for about 4 layers, tomato sauce and meatballs, cheese sauce, raw lasagne sheets and repeat. Top with grated cheese and semolina before leaving to cool, wrapping in foil and leaving in the fridge. You could make this on the night, but, let's be honest, it's quite a chore so it makes sense to do this the day ahead. Either way, bake at 200 for 45 minutes (shorter if you're cooking straight away).

Monday, 2 May 2016
Chocolate Field Mice Cake
Behold, my first successful decorating of a cake. To be honest, I don't know why this bizarre formulation came to me- I imagine it was some combination between my sudden onset admiration for simple and original cake decoration and coming across the chocolate mouse mold I bought when I was about 10. The idea first came to me in the carnation of adorning a chocolate cake with the mice, and then came to me the idea of incorporating cream cheese. Yes, I know what you think- why not just make it a cheesecake? I actually thought far too long and hard about that dilemma- for one, I don't like cheesecake enough to consider adorning it with tempered chocolate (yes, I did even go through the arduous process of tempering the chocolate) and two, I consider a cheesecake (a proper baked one) a thing of simple beauty that when embellished becomes blurred. Therefore, this cake has cream cheese beaten into it and is covered with a thick chocolate cream cheese frosting. After the mice inhabited the cake, they looked rather lonely so to add dimension and a field theme, I added sugar flowers. It was still too 2D, but green peeled pistachios added enough colour and activity to make this cake, if I do say so myself in a fit of excitement, a simple, messy but effective piece.
This cake method is very classic and easy, simply beat butter and sugar, add eggs and fold in dry ingredients. Same with the frosting, an easy cream cheese frosting with melted chocolate incorporated. Probably the two hardest elements are tempering the chocolate although I did find a thermometer-free method on t'Internet and frosting it is easy provided you have the insanely useful large palette knife.
1)Preheat the oven to 170 degrees and ensure it is not on the quick fast cook setting (that mistake has been made many times) and grease 2 sandwich cake tins and line them with just a circle of greaseproof paper. I find lining the sides too just increases the difficulty of removing the cakes, but it's up to you.
2)Briefly combine 165g plain flour, 25g cocoa powder, 1 tsp baking powder, 1/2 tsp bicarbonate of soda and a pinch of salt. No need to sieve.
2)Beat 150g soft unsalted butter or baking margarine and 50g soft cream cheese with 200g caster sugar until light and fluffy. Add 2 eggs, 2 tbsp of the dry ingredients, beat more then add 2 more eggs and 2 more tbsp of dry ingredients. Finally fold in the remaining dry ingredients.
3)To thin the mixture add about 3 tbsp boiling water and fold in thoroughly.
4)Pour into the prepared tins and bake for about 25 minutes, checking at 15.
5)When a skewer inserted in the centre of the cakes comes out clean, the cakes are ready. Leave to cool in the tin for 5 minutes then invert onto a wire rack and peel off the paper.
6)While the cakes are cooling, make the mice. Chop 200g dark chocolate finely then place in a food processor. Blend until it clumps together in a ball (this takes a long time). Break the ball apart with your fingers and continue to blend. It's worth blending at intervals so the motor doesn't get overworked. Whilst blending, fill a glass bowl with boiling water, leave for 5 minutes and pour the water out. When the chocolate looks very smooth and thin, like a ganache, pour it into the bowl and stir. It should now be at around 90 degrees. Pour into your chocolate mouse mold (because everyone has one of those) and leave to set in the fridge.
7)Instead of the utterly laborious and hateful task of sieving 500g icing sugar and 2 tbsp cocoa powder, simply blitz it in the food processor (no need to wash either because a bit of melted chocolate should be fine). In the meantime, set a bowl of 110g good dark chocolate over a pan of simmering water (but the bowl shouldn't touch the water) and melt it. Blend 250g soft cream cheese and 50g soft unsalted butter together, then add the melted chocolate slowly and then very slowly and gradually incorporate the icing sugar and cocoa powder. When smooth and very fluffy, you can ice the cold cakes.
8)Set one cake on the bottom of the stand, and add a generous dollop of icing in the middle, then use a palette knife to spread it all over. Set the other cake on top of that, then dollop the rest of the icing on the top and sides of the cake. Start by using the palette knife to spread the icing evenly, then use it to accentuate peaks and swirls all over. Set the set mice over the top, then in juvenile fashion decorate with sugar flowers and peeled pistachios.

Wednesday, 27 April 2016
Roast Leg of Lamb with Toast and Mushy Peas
I love having a diverse repertoire of Sunday lunches- it makes me feel that bit more British. But don't worry, this isn't an attempt to be achingly patriotic (i.e, I haven't tried combining a roast dinner with the shamefully delicious snot that accompanies fish and chips) it's just a lovely alternative to the slightly laborious original. Having said that, all that is diverse here is the accompaniments, I haven't fiddled with a roast leg of lamb because, trust me, it doesn't need it.
If you wanted to you could make this sound fancy and call the sides croutons and pea puree, but George Orwell once said to never use a long word when a short one will do so I found these nursery names suggested by my Grandmother charming.
1)In a large roasting tin, place a leg of lamb over 6 bruised garlic cloves and a few sprigs of rosemary, and then adorn the top with the same. Juice a lemon over it and throw in the husk with it, and drizzle everything with 2 tbsp Worcestershire sauce and 4 of red vermouth or port. Place in a 200 degree oven for 20 minutes, then reduce the heat to 170 and cook for another 45 minutes to an hour until only a dribble of pink remains when the thickest area of the joint is pierced with a knife.
2)Leave it to rest wrapped in foil whilst you prepare the sides.
3)For the cubes of toast you really need good bread. To do this I usually make a loaf on the quickest cycle on my bread machine, but you could buy one or make it the night before. I'd suggest white because you can't get wholemeal roast potatoes.
4)Cube them into inch squared dice, drizzle with garlic-infused olive oil and sprinkle with coarse salt and pepper then roast in the 200 degree oven which doesn't need to be preheated as it should be still hot from the lamb. They need about 15 minutes until crisp and golden.
5)For the mushy peas, boil 500g frozen peas until just tender in boiling water infused with two bay leaves and a peeled clove of garlic. Drain the peas but keep the water as it's useful to thin the puree until it's your desired consistency. Fish out the leaves but keep the garlic, then blend with 3 tbsp (or as much as the consistency of your desire) creme fraiche or mascarpone or even cottage cheese, a pinch or more of white pepper, some freshly grated nutmeg, a good pinch dried mint, salt, freshly grated parmesan (a fair amount I'd say about 3 tbsp but don't bother to measure) and some chopped fresh mint or parsley or both. When smooth, set into a nice serving plate.
6)To make a quick, flour-free gravy, de-glaze the lamb's roasting tin with 100ml red vermouth, a knob of butter, some finely chopped rosemary, a beef or lamb stock cube, salt and pepper and more boiling water until you have more gravy than you need. Boil until reduced to a more syrupy thickness.
7)Serve bejewelled with redcurrant jelly. Lots of it.


Saturday, 23 April 2016
Crispy Hoisin Duck with Pancakes
It's a toss up between whether serving duck the French way, with a glossy orange sauce, or this way, everyone's favourite starter in a Chinese Restaurant is a better option. Either way, they both observe that the rich, fatty flavour of duck doesn't need much help, and you shouldn't either when recreating this dish at home.
Hoisin sauce is easy to come by and it's a useful thing to keep in the larder for Asian cooking, and if you intend to cook this often (a good idea given how much Gressingham ducks seem to be on sale recently) you can take a jaunt to an Asian grocery and buy the frozen pancakes. Both are surprisingly very cheap and even if you can't find the pancakes use tortillas.
There is an entirely optional but great step that you can take to ensure your duck has unctuously crisp skin and melting flesh, hijacked from a certain Simon Hopkinson and his Christmas goose. Puncture the skin lightly with a skewer and pour over boiling water. Dry the skin really well and leave the duck out at room temperature so the skin is really parchmenty and dry, then continue with the recipe from step 1. The skin does really need to be devoid of any moisture, so it's useful to do this the night before and leave it uncovered in the fridge or set a gentle electric fan by it for an hour, turning regularly. Sounds bizarre, but not as bizarre as using a bicycle pump to separate the skin from the meat which you will come across sometimes with crispy duck.
1)Set a large duck over a rack over a roasting tin (the rack mostly comes with the roasting tin anyway- if not, then just use one of the oven racks set over the roasting tin). Sprinkle the skin with 2 tsp Chinese five spice powder (legs, back everything) then sprinkle with a little salt and lots of pepper in and out of the cavity. Slow cook for a good five hours at a low 150 degrees oven. The duck will render liquid gold as it cooks- the duck fat that leeches from it is magical and should be saved in a jar to make fabulously crisp roast potatoes and hashes.
2)Take the duck out to rest, whilst you prepare the veg. Traditional is cucumber and spring onion, but cucumber aggravates my stomach massively so I use slices of avocado topped with lime juice and sea salt. Spring onions are okay. Shredded romaine lettuce is also nice.
3)Shred the duck with two forks (or a pair of asbestos hands) and serve with the thawed pancakes steamed briefly in a bamboo steamer, and plenty of hoisin sauce. Shaved ginger works well, as does some sliced plums. Go with whatever your soul sings (if you're lucky enough to have one).

Wednesday, 20 April 2016
Amarula Tiramisu
You should find in your life that if you eat out regularly or throw dinner parties (as I have done here) many, many people suffer from tiramisitis- a heavy bias bordering on addiction towards the coffee dessert when choosing the last course at restaurants. Obviously, since as humans we're disgusting inhospitable creatures, you're not going to provide a dessert menu when cooking in your own home. Therefore, provide a simpler to make than you think tiramisu, and watch your guests wolf it down.
I myself am a devastating sufferer of tiramisitis and thus I'm starting to develop a worrying amount of tiramisu recipes. My back-of-the-packet recipe is very plain and very good, but sometimes you need it jazzing up. This is the way to do it- buy a bottle of a luscious African cream liqueur called Amarula, if you can't get it use Bailey's but it's quite easy to find in supermarkets now, then tar your mascarpone and savoirardi with a brown envelope tone and imbue everything with a warm, spiced alcoholic flavour.
1)Combine 350ml strong fresh cooled coffee with 100ml amarula and 2 tbsp dark rum. Soak some savoiardi or regular sponge fingers in it (hard to measure how many because it depends on the dimensions of the glass dish your filling) until they're really saturated, then carefully use them to line the base of a glass dish around 22cm^2. Set aside while you prepare the cream.
2)Separate 2 eggs, and whisk the whites until stiff.
3)In a separate bowl, whisk the yolks with 90g brown sugar until pale and creamy, then fold in 500g mascarpone that's at room temperature and 50ml more amarula. When smooth, fold in the whites until everything is smooth.
4)Spread half the cream over the sponge fingers, then repeat step 1 and this step and smooth over the top cream.
5)Leave to set covered overnight in the fridge then before you serve top with 200g toasted Brazil nuts mixed with 50g cocoa powder, then using a fine sieve dust with more cocoa. Use some kitchen roll to carefully wipe the rim of the dish.
Saturday, 16 April 2016
Keralan Fish Curry with Mango and Tamarind
You may be unfamiliar, as I was for a while, with South Indian cuisine. For some reason, it is extremely different from Northern Indian food, being, in my opinion, more similar to Thai curries; coconut milk based, with lighter, but more emphatic sweet and sour flavours. The dish I based this particular curry on is called 'meen manga' and is soured from the flavour of underripe mangoes, but using them would hurt my soul, not least because I hate the grassy flavour of an unripe mango. Instead, I use a ripe mango, in fact here so ripe that instead of chopping into neat cubes although normally I would cut two slices on either side of the stone and use a glass to push the flesh from each slice from the skin, I simply mangled the chopped fruit, getting juice, pulp and flecks of flesh. To get the sour element, I used tamarind concentrate, but you could use the block you have to dissolve in water, but it's a bit more of a pain. If you opted for that camp, you'll need to probably triple the mass as it's not concentrated.
1)This step is common in almost all curries, (but this comes from a person who makes a spiced stew from leftover meat and calls it curry) you make a base with one sliced onion, and sauté it with whatever flavours are appropriate. Here, you need 3cm finely shredded ginger, 3 crushed garlic cloves and 2 green chillies, finely chopped. It's up to you if you leave the seeds in or not.
2)Whilst the onions are softening, coat 4 small white fish fillets (450g cod, hake, basa etc) that have been chunked thickly in 1 1/2 tsp ground turmeric and the same of cumin, plus some salt. You may want to use washing up gloves for this to keep your hands from looking like your liver's given up. Leave to marinate whilst you prepare the rest of the curry.
3)Add very simple spices to the onions- 2 tsp ground coriander, a pinch or more (if you dare) of chilli flakes and a small handful of curry leaves.
4)Make a sauce with a 400ml tin coconut milk, 1 2/3 (1 tbsp and 2 tsp) tamarind concentrate, and bring it up to a litre with fish stock. Add to the onions, and simmer it but don't let it come to a rolling boil or the coconut milk may separate. It probably will anyway to be frank but no need to shatter the emulsion. Once simmering add 3 small or 2 large mangoes, prepared as above.Add your fish and 2 mangoes prepared as above. Once they're done squeeze any juice or pulp from the stones and then, as your cook's treat, scrape the buttery flesh from the stone with your teeth. Let it simmer for about half an hour. At this stage you can turn the heat off and reheat the curry as and when you need it, adding the fish last minute.
5)Before you serve, add the fish and cook until just tender, about 4 minutes.
5)Serve over tender rice and the finely chopped coriander leaves. I added some frozen peas and green beans to this, but looking back I really don't think it needed it.
Wednesday, 13 April 2016
DEATH BY CHURROS! (and a little salad but whatever)
If you have a death wish for your family, this recipe may be the kindest way of going about it. Deep fried strips of doughnut, coated in cinnamon sugar and dipped in velvety chocolate-peanut butter sauce. It's unbelievable how far the human race has come in health and well-being and somehow these lethal morsels are still allowed?! And miraculously, compared to their plump, pompous cousin the doughnut, they are light and dangerously easy to chow down.
If you fancy a light main beforehand (and VERY light) I make a Morrocan-inspired prawn salad. Simply cook a packet of raw frozen prawns in a little oil and orange zest, whilst dissolving a pinch of saffron in the orange juice in a small pan over a light heat, throwing it into the prawns with a pinch of ground cumin, a crushed clove of garlic and some paprika and then tossing over some romaine lettuce and pomegranate seeds that have been lightly dressed with golden rapeseed oil. A little pinch of sumac over the top lifts this even higher.
1)In a small pan, melt 75g dark chocolate into 100ml sour cream, 3 tbsp rich smooth peanut butter (I use Reese's) and 2 tbsp golden syrup until smooth. Switch off the heat and add a splash of milk so it reaches a more pourable consistency. Leave to cool.
2)Set a large, moderately large pan of vegetable oil on to a gentle heat.
3)Heat 300ml water and 100ml flavourless vegetable oil (such as sunflower) until boiling, then briskly beat in 140g plain flour until you have a smooth ball of dough. It will look very bizarre. Leave to cool for 10 minutes before beating in two eggs, 1 at a time. It takes some elbow grease to get it completely smooth.
4)Place a piping bag fitted with a star nozzle into a large jug or glass, and fill it with the batter. Squeeze into the bottom of the bag.
5)Test a small bit of dough in the oil. It should sizzle, but not madly and will brown in around 30 seconds. If it is too hot, switch it off until cooler then set over a heat again.
6)Squeeze strips of about 5 inches (any longer and they will be quite difficult to flip in the oil) into the oil, using a knife to cut the end of dough off. Cook for about 2 minutes, flipping a few times. This will take multiple batches.
7)Transfer to kitchen paper, then roll in 50g caster sugar mixed with 2 tsp ground cinnamon. Serve plunged precariously into the warm chocolate sauce.

Monday, 11 April 2016
Not-really-rib-sticking Moroccan Lamb Ribs
It seems wrong, somehow to start a recipe with 'not', but I'd like to clarify first off when this meal is appropriate, and when it (sadly) often isn't. When it is appropriate is when you're not in the mood for something vastly heavy, simply down to the fact that lamb ribs don't offer much meat but they do offer lots of melting fat and bags of flavour, and for when you want a messy, hands-on supper that seems to evoke a really lively family atmosphere. I wouldn't recommend this for when you're utterly ravishing, need a meal you can eat in mere seconds by shoveling goo out of a bowl. It happens a lot, I suppose.
Anyway, enough of that, I need to explain why you haven't been living properly yet. Lamb ribs are a well kept secret amongst supermarkets- these ugly, cheap cuts are not commonly eaten or sold, and thus you will have to do some digging; once you've got past those leaner than lean fillets and legs, you may be lucky to find a set of lamb ribs. More tender and flavoursome than beef ones, and cheap enough to allow the expense of the Moroccan spices that are used not to mask the grotesque looking meat (as would have been done historically to peasant food) but to adorn them. If all you can find is a lamb rib that's just one big rack, it's worth the effort of chopping them up.
I serve this with my light, Middle-Eastern inspired chickpea salad- two chopped celery ribs (we're on a theme here aren't we?), one diced avocado with its anti-aging cream-lemon juice, a drained tin of chickpeas dressed with 2 tbsp each tahini and yoghurt and enough salt, paprika and caraway/cumin seeds to bring pep but not heat.
1)You'll need a whole jar of Moroccan harissa paste (about 75g). You can get it easily in supermarkets but if you're lucky enough to buy from a specialist shop, do. It may even be cheaper. To this, add 1 tbsp dark soy sauce, 1 tsp ground allspice, 1 tsp ground cinnamon and 2 of whole cumin seeds.
2)Use your first rib to stir these together, then coat each one (have about 3 per person) in the spice mixture and transfer to a hot grill. They need a mere 5 minutes a side, enough to cook through but remain tender and certainly enough to make the harissa caramelise slightly.
Saturday, 9 April 2016
Pasta Puttanesca (how's your father)
I can't tell you how long I've been waiting to post this recipe. It's true, I'm quite an immature person so a cheap and inexplicably easy pasta recipe that translates to 'pasta cooked in the whore's way' is immensely entertaining to me. I'm not joking- 'puttana' is Italian for whore/slut and there are numerous explanations for this vulgar name- it is salty, strong flavoured, quick to make, and (most importantly to its slutty origins) can be made from store cupboard staples that come in tins or jars. This means the dish can be prepared easily and quickly after a bit of drinking and how's your father.
I'm not done yet; my friend is an incredibly hilarious soul who gave me a box of penis-shaped pasta that one is supposedly to enlarge in a steamy pan of salty water. Perfect for this sauce? Right? Well aside from tastelessness value, no, this is supposed to be served with spaghetti, but a bowl of bellends seem just as perfect to soak up those salty juices. One more thing, then you can put me down: please buy unpitted black olives for this, those big black balls taste much better with the hard bit inside.
1)In a large pan of well-salted boiling water, tumble in 200g penis pasta (to serve 4) and set a timer to 8 minutes.
2)Crush 2 cloves of garlic into a well-oiled pan (the oil must be cold to prevent the garlic burning) and add 1/2 tsp dried chilli flakes. Switch on a gentle heat, then add 8 good-quality anchovy fillets. If you have a wooden fork on hand, use it here to help the anchovies almost dissolve in the hot oil.
3)Add 1 tin chopped tomatoes and half fill the tin with water and add that too. Bring to the boil, then turn down the heat and add 100g whole black olives and 1 tbsp capers. To balance the tart tomatoes, add a pinch of sugar and 1 tsp balsamic vinegar (or if your capers were stored in vinegar use that). Simmer gently until the pasta is cooked.
4)Before you drain the pasta, reserve about 1/2 cup of the starchy water it was cooked in. Drain the pasta and toss into the sauce. Add enough water to loosen it, and a small knob (sorry) of butter.
5)Leave to stand for a few minutes before sprinkling with chopped fresh parsley and serving to a tolerant family.

Sunday, 3 April 2016
Paella 2.0
I've made paella before, many many times, but only once did I write it down and post it here. In the same post I arrogantly belittled Lorraine Pascale's recipe for paella, and somehow supposed that my recipe was any better? A few days later, in the same haste that I posted the recipe, I deleted it because I simply knew in my heart it was rubbish. Risotto-esque and gluey in texture, with a weak flavour and ugly demeanour. In fact, I had lost all confidence in the recipe when I added the blurry photo to the post. Utter rubbish; but this self-criticism doesn't mean the objective of this post is to outdo myself, nor is it an attempt to change the view of paella, in or outside of Spain (I mean, hell, how would I manage that?!) This is just what I think:
Paella is a famed Spanish dish of saffron-dyed rice, chicken (or in many parts of Spain rabbit or snail) and seafood. Sounds very simple, but somehow any recipe posted by someone outside of Spain becomes the subject of enormous controversy, with many complaining that the recipe should be banned because of its dissimilarity to the original. Since when was cooking that black and white? In my humble opinion, you can't really call any one paella recipe correct given that its origins come from all over Spain, and many different parts have created many different recipes of it. However, there are some underlying rules that I (in the most part) have tried to follow.
Pascale's recipe, which I derided (although not as heavily as some paella-preserving-keyboard-warriors) seemed to observe none of these rules, but it looked stunning and you know it would taste divine. Is paella therefore something that has to be 100% authentic? I don't know, my recipe respects tradition but both circumstance and personal taste resulted in a little unruliness.
A few tips from me and 'The Paella Company' I used to try and make my paella genuine:
- Unless you have some rabbit or snails on hand to replace it, omit the chicken. It adds too much faff to the whole procedure and along with the strong flavours of seafood and saffron, you don't need it.
- Purchase the right rice- it's simply called paella rice and that's how you'll find it in most supermarkets, but if you're lucky and budget isn't such a problem, you can buy the brand 'Bomba'. It's Spain's favourite and can absorb three times its volume of stock. Arborio and sushi rice are similar, so you can use them instead.
- Don't be tempted to recreate the gorgeous colour of paella with turmeric or just paprika, it's a bite out of the wallet but saffron is essential for flavour.
- It might be worth buying a good paella pan for this- it distributes the heat the best throughout the dish and is beautiful in itself. And also, it is just a wide, deep metal frying pan and can be used for as many things as the description suggests. The pan can be a big attractive frying pan to cook a killer brunch and I'm sure you can think of any number of other uses. If not, use a good, thick enamel cast iron pan- the kind Le Creuset or (luckily) Sainsbury's sell.
- A paella pan cooks things at an intense heat, so go gentle on the flame.
- You may find that you need to move the pan around the flame so all the rice is cooked evenly.
- Once rice is added to the stock, you may not stir. This is because paella rice is similar to risotto rice (arborio) and when it's stirred it releases starch and goes creamy, incorrect for paella. Like caramel, you may gently swirl the pan to distribute rice but you are forbidden to stir.
- Don't cook seafood with the rice, cook it separately then adorn the surface with the fish before you serve.
- You can use white wine in this, which is more authentic, but I don't like white wine, so I go for a rich cream or Amontadillo sherry.
- This is fabulous for when you have people over, but I think this is perfectly doable for everyday, too.
- This is my own personal gripe about pronunciation, but in the Spanish language a double 'l' is pronounced with a 'y', so pronounce this dish 'pie-eh-ya' not 'pie-ella'.
2)You're now going to prepare a concentrated tomato base called 'Sofrito'. Finely slice an onion and fry until soft gently in the chorizo oil. Add 1 can of chopped tomatoes and 4 cloves crushed garlic (best to add it here so it can't burn). Fry viciously until it reduces and you're left with a thick, intensely red paste.
3)Add 1 litre chicken or fish stock, 1 small glass cream sherry, salt and pepper to taste and a good pinch or two of saffron soaked in 2 tbsp hot water, and obviously stir in the chorizo that's been waiting patiently on its plate, 100g each frozen green beans or peas and broad beans and 1 tsp sweet smoked paprika. Bring to the boil.
4)Sprinkle over 250g paella rice evenly, shake the pan very gently until the rice is dispersed evenly.
5)Leave over a fairly low heat for about 10 minutes covered with either foil or a big baking sheet or, indeed, a lid, until the rice has absorbed nearly all of the liquid. If the rice is still floating in lots of liquid then just leave it on the heat until it absorbs the excess.
6)Switch off the heat, and leave to rest for at least 10 minutes.
7)Cook some defrosted frozen baby squid, cut into ringlets and also keep its tentacles and frozen king prawns until fully cooked with 3 sliced spring onions and a deseeded red chilli in a little olive oil until everything is just cooked. I used Californian baby squid which was wonderful, apart from excreting a strange pink semen after it was fully cooked. Set aside whilst you prepare the pièce de résistance.
8)I didn't quite get this right admittedly, but here's what The Paella Company tells you to do. To create the caramelised, sticky rice at the bottom of the pan, called 'Socorrat', turn up the heat to full under the rice and it should make a 'popping' sound. After just 30 seconds or so, switch off the heat.
9)To serve, sprinkle with chopped parsley and wedged lemons. Don't serve piping hot, if it's still very hot after resting, leave to come to slightly cooler but still warm.


Thursday, 31 March 2016
Pollo Agridulce
Forgive the fancy name, this is really just sweet and sour chicken without any Asian influence. This recipe was thrown together from memories of a Nigel Slater video where he prepared, based on his love of opposites attracting, this meal. I believe he just called it sticky sweet and sour chicken or something (I couldn't be bothered to rewatch the video once I'd got into the swing of the kitchen). It was subtitled with Spanish translation, and thus the title of the video was a rather sexy name going by 'pollo agridulce'. I gratefully magpie'd it in the knowledge I'd sound that bit more like I know what I'm talking about.
To serve with this Slater provided a really zingy, almost bitter sour salad (well, more of a relish) and to make it more of a meal I threw in some chipolata sausages and diced red-skin potatoes. For a splash of green, I'd suggest a peppery salad, although I used some leftover Canada coleslaw I had made. So we're really sticking to this Spanish theme aren't we?
1)Marinade 5 chicken thighs (skin on, bone in) in a mixture of 2 tbsp wholegrain mustard, 3 crushed garlic cloves, the juice of a lemon plus the emptied husk, 1 tbsp dark soy sauce and 4 of maple syrup. Slater suggested honey but maple syrup is so smokey its sweetness doesn't attack you like honey. Smoosh the chicken around in it, and add 10 chipolata sausages, or about 6 fat ones like Cumberland. Leave to marinate overnight in the fridge or a good few hours at room temperature, in direct sunlight or right next to a starved spaniel.
2)When you're ready to cook, tip the chicken, sausages and marinade into a lightly oiled baking tin and add 4 chunked, unpeeled potatoes.
3)Bake at 200 degrees for 10 minutes, then lower the heat 180 and bake for 30-35 minutes.
4)To prepare the relish, quarter 3 preserved lemons, scoop out the fleshy bit leaving the skin and finely dice. Take 100g unpitted black olives (so much better than the plasticky pitted ones) and I tend to just maul at them to remove the stone and break them apart. Toss together with a head of roughly chopped parsley.
5)Take the chicken out of the oven, and devour with the lemon salad.
Monday, 28 March 2016
Leftover Cannellini Pilau
When there's a lot of meat leftover after a Sunday Lunch or midweek roast, I often turn it into a pilau, delicious Indian sweet spicy rice with sultanas and pistachios. Today I wanted to do the same, but failed to be inspired to cook in time to bother with the faff of washing and cooking volatile basmati rice. Therefore, I decided to key into my inner-improv and use the starch of two tins of cannelini beans in place of rice, and have them soak up a good glug of marsala as well as all the evocative spices. They did an excellent job, but unfortunately they lack the moisture of rice, so by my Mother's suggestion I added natural yoghurt- it successfuly cuts through the dryness and counters the sweetness with its tang, plus, you know #healthy bacteria.
It doesn't hurt either that this is very, very quick to make.
If you have any klowunji (Nigella) seeds on hand, they add a nice dimension, but if not, don't worry.
1)Finely chop 1 onion and cook it in 2 tbsp ghee (clarified butter). Also add 3 crushed cardamom pod, 3 cloves, some freshly ground black pepper, 1/2 tsp crushed dried chilli, 1 tsp turmeric, 2 tsp cumin seeds, 3 crushed garlic cloves, a cm piece of ginger finely minced, 2 tsp ground cinnamon, 2 tsp dried mint and 2 tsp klowunji seeds (if using). Cook until toasty, then add 200ml marsala.
2)Add 100g sultanas and 200g frozen peas and cook for about 5 minutes until the sultanas are nice and plump. Add 1 tin drained cannelini beans and continue to cook until they're piping hot, also add however much cooked, cold meat you want. Today it was lamb. Also add 100g chopped pistachios and flaked almonds.
3)Just before you serve, add 200ml natural yoghurt beaten with 2 eggs and a handful of chopped mint. Season with salt and be generous as the beans can take a lot.
Sunday, 27 March 2016
Leeks In Cheese Sauce
Immediately, I'm sure many of you have come across this title and dismissed it as retro-mush. And fair enough, too. This kind of dish is very old-fashioned, but it's a shame terms such as 'retro', 'vintage' or 'old-fashioned' connote fashion, and I am the quintessential person who pushes against the current of what's cool at the moment. In food, it can be the best thing to invite dormant recipes back to the table; alright, old recipes that worked on the principle that everything is better suspended in jelly are perhaps better off fossilised, but things like this are perfect for revitalising.
It's very simple, to get a delicious cheese sauce, use delicious cheese. I love some Swiss in there, plus blue cheese and a bit of soft cheese (or cut out the middle man and use soft blue cheese like dolcelatte), mozzarella is lovely for stringiness, but bear in mind it doesn't have a lot of taste. For budget, I bulk out these more expensive cheeses with a cheap but good sharp cheddar or red Leicester (which helps for colour too) and some very hard cheese like parmesan. I have to say, I used to make white sauces where the roux was an insoluble thick ball of dough, like pastry that had to be diluted with milk, and the hateful job seemed to never end. I don't bother with that now, make the roux runny enough so it blends with the milk easily.
I made this as part of the main in a three course dinner party, but there's nothing to stop you having this as a day-to-day meal.
Take a nice pan that will go to the oven (think cast iron) and brown the leeks until soft and well coloured. Continue to cook until they're al dente soft. Remove the leeks to a plate and tip away any excess liquid before continuing.
Melt 80g butter into the caramel scorched pan and add 3 tbsp flour and 2 tso mustard powder. Stir until you have a smooth paste. Turn off the heat and add 1 litre full fat milk, stirring constantly to avoid lump stress. You don't need to heat the milk up so much here, as the dish needs to be wide and shallow so has a big surface area to heat the sauce up to thicken. Add approx. 250g grated cheese and stir off the heat until just melted. Season to taste with salt, pepper and nutmeg.
Return the leeks to the sauce and top with breadcrumbs and a little more grated cheddar cheese.
Bake in a hot oven until bubbling and golden, which only takes around 10 minutes as the leeks are already cooked.
I should tell you that this makes fabulous cauliflower cheese- steam florets of 1 head cauliflower for 6 minutes until slightly soft and line these over a baking dish. Pour over the cheese sauce made separately in a saucepan and crumble a bit more cheese on top. Add 2 tbsp breadcrumbs and bake for 15 minutes until bubbling and the cauliflower is hot all through. If you want to skip the steaming part, the cauliflower will go in raw but you will have a runnier sauce and you will need to bake it for about 35 minutes. This is fine, it's not as if you have to do anything in at the time. That is if you're not making hot fresh chips to go with this.
Friday, 25 March 2016
Simple Pheasant Breasts and Ginger Ice Cream Floats
I know I'm a bit eccentric in the kitchen, and quite often use more than necessary ingredients, so sometimes it is difficult to hold back and keep a recipe to its basics. This comes into its own most with good-quality game meats; take duck for example, all you need is a little orange and a good salad and the taste of the meat carries the meal the rest of the way. Here, it's pheasant breasts which I buy in vacuum packs from good butchers in fairly high quantity, freeze some and cook the rest there and then. All I need is a salad with a good, golden, gutsy dressing, creamy polenta, some crispy bacon and a red vermouth sauce. You needn't even dig out a chopping board.
I don't believe that dessert should be served just on special days; I don't mean you should prepare a massive pavlova day-to-day (although don't get me wrong I would if I could), but just some fresh fruit and chocolate or you can spruce up bought vanilla ice cream with chocolate peanut butter sauce, toasted hazelnuts and maple syrup, raisins or sultanas soaked in dark rum- the list is endless. One of my favourites is an ice cream float, an American invention that consists purely of a scoop of ice cream and whatever fizzy drink you like, the carbonation creating a thick layer of creamy foam (that foam can be punctuated with a little prickle of bourbon or vodka if you're that way inclined). I drink a lot of ginger beer because I love a good Shirley Temple sharpened with some lime or lemon, and it gives a delicious bit of bite to the pudding.
1)In a drizzle of oil, cook 4 pheasant breasts over high heat until the meat is seared, with the tiniest hint of rarity within. In the same pan, cook 4 rashers of smoked bacon until very crisp. Keep the pheasant warm in some foil meanwhile.
2)Mix up (roughly as this is to taste) 2:1 rapeseed oil and white wine vinegar with a good dash of dijon or English mustard and 1/2 tsp or so of sea salt. Add a little water until it's the right consistency. Use it to dress the salad at the last minute.
3)To serve 4, sprinkle 200g polenta over 800ml boiling salted water and stir immediately until slightly less thick than mashed potato (it will continue to thicken as it cools). From here on in it's exactly the same as mashed potato so add as much milk, butter and salt and pepper as you wish.
4)In the hot pan that the bacon was cooked in, bubble away 200ml red vermouth with pepper and a small handful of fresh sage, snipped in with kitchen scissors. That's everything for the main done!
5)Do the ice cream floats at the table for a bit of fun (I know, life of the party, right?), simply scoop a dollop of soft vanilla ice cream in the bottom of a tall glass and top with as much ginger beer as it can take before spilling, although when it does spill it's somehow wonderful.
Wednesday, 23 March 2016
Stromboli
I absolutely detest the Americanisation of Italian food- a delicate and subtle cuisine has been obliterated and replaced with big plates of honking, brash sweet and salty foods with no creativity or fineness. Especially pizza, no delicate flavours, no thin crispy base, just as much cheese and silly toppings like steak as possible. However, this for once, cuts it. A rolled up pizza invented in New York that is simply divine.
As with any pizza, you can fill it how you want, these are just some of my favourite fillings. Try to go for ones that don't introduce too much moisture into the dough, such as mushrooms or lots of tomato sauce.
1)Combine 500g Italian '00' flour (of course you could use regular strong white bread flour, but I love the Italian stuff for pizza dough) plus 2 tsp salt, and here I use fine table salt as it dissolves easier into the dough. Add 1 tsp sugar and a 7g sachet of fast-action dry yeast, 40ml good olive oil and 300ml of regular cold tap water. Knead together to a dough, then knead vigorously for about 5-10 minutes until smooth and elastic. Do this by hand or in a machine.
2)Transfer to an oiled bowl and cover with clingfilm. Leave to rise at room temperature until doubled in size. About 2 hours.
3)Punch the dough down, like sinking your hands into just-slaughtered flesh, and leave to rest and relax for about 10 minutes. When it's had its time, transfer to a lightly oiled baking tin, fairly large and spread all to the corners. Be persistent and gentle and the dough will get there.
4)In a large frying pan cook about 5 rashers of smoked back bacon, nice and lean, until not crispy but well cooked, then deglaze the pan with a tbsp sherry vinegar.
5)Spread a few tbsp tomato puree all over the dough, excluding about an inch around the rim. Add the bacon, some grated sharp cheddar cheese, or any cheese you wanted, so handful of fresh rocket, then for seasoning a tsp of paprika, a drizzle of garlic oil, a tbsp dried oregano and the sherry vinegar.
6)Fold the two shorter sides of the stromboli in about an inch to seal, then roll the whole thing up from the longest side towards you. Have the seam at the bottom of the loaf. Cover with oiled clingfilm then prove again for another 45-60 minutes. Sometime within the proving time set the oven to 170 degrees Celsius.
7)Remove the cling, and drizzle with more garlic oil, oregano and paprika. I added sesame seeds hoping for extra crunch, but that didn't materialise.
8)Bake for about 35 minutes in the oven, made steamy with some water or ice cubes at the bottom, until the crust is crisp and it sounds hollow all over when tapped.
Monday, 21 March 2016
Tuna Steaks with Watermelon, Feta and Black Bean Salad
When a TV chef I've grown fond of brings out a hotly-anticipated new episode or book and changes their tone to trendy superfood and healthy eating, I somehow feel betrayed. Maybe it's because I feel that if they present episodes of fattening and sugary plates of food, then I can do the same in my own kitchen? I don't know, and it is this odd viewpoint I take that has led me to state very explicitly that this recipe is not designed to be incredibly nourishing, low-fat or any other adjectives that induces immovable guilt (or smugness, for some), it is coincidentally good for you. I'm not saying I'm not glad that it is healthy, I go in temple-food moods occasionally and it's a quite enjoyable if irritating state to be in, but you should only eat this because it tastes delicious.
I'm more than a little proud that I managed to create a dish that gels so well together, and if I were ever to write a cook book then this meal would be included in a 'quick and easy' section, because they're exactly what this meal is. I buy frozen tuna steaks for this as it's cheaper and more practical, as tuna steaks must be eaten on the day of purchase, although if I fancy indulging myself I will of course by fresh.
An issue with this meal, well, less of an issue just a matter, is that it appears to have no source. Feta from Greece, watermelon isn't very authentic anywhere, and black beans and lime flavours from Mexico? Whatever, you know I love being a free spirit.
1)Set a griddle, or frying pan lined with a thin layer of olive oil on to medium-high heat.
2)Chop half a medium watermelon into rough dice, then dump a drained tin of black beans (which are disappointingly a bit more purple-brown than black) plus three finely chopped spring onions, the juice of half a lime, 200g chopped feta, a head of chopped coriander and plenty of sea salt flakes. You don't need any oil to dress it, as it wouldn't emulsify and coat the watermelon properly. Toss altogether and set aside.
3)If you're using fresh tuna, cook for a brief couple of minutes on each side, with a little oil on them and salt and pepper scrunched on either side of the fillet and if frozen do the same but thaw them! These of course can be cooked from frozen, believe it or not fish is very obliging about being cooked straight from the icy depths, but it's inadvisable here as you can't achieve rareness. In both cases, you want defined grill lines. And that's it!


Sunday, 20 March 2016
Alexander Pavlova
I don't expect any of you to follow this blog to such a loyal extent, but you may have noticed my mild absence recently. This, in fact, is a good thing; over the last week, instead of cooking up fresh ideas, I've been going over my good, everyday recipes such as my beetroot lasagne, fried chicken, and discovered numerous improvements which I've updated the recipe with. Indeed this is unreliable as you may never if you're cooking the best version of the recipe (although I'm not proposing anyone has actually used this blog to cook from) but I feel calmer in this relaxed, slightly repetitive paradigm of meals that I've already cooked.
Pavlova on the other hand is something that I've always thought I'm okay at making. 3 egg whites, 175g caster sugar, a bit of cornflour and vinegar, cook for a long time at a low temperature. Bob's your uncle. However, that was until I discovered the epitome of Australian food writing- Stephanie Alexander, who obviously knows a thing or two about pavlova. She recommended many extra steps (the divine revelation that you should flip the pavlova over before cream is piled on), and along with my own tips (half brown sugar and less weight of sugar, for example) I created a fabulous, and I won't say perfect because what a vile description that is, pavlova. I've also named this Alexander because the bulkiness and tan colour of the cooked meringue reminds me very much of a boy in my triple science class who shares the prestigious title of 'Alex'. I do hope he comes across this post one day...
To make meringues at a pinch, 'pinch' being a total lie because meringue can't be made quickly, whenever a recipe requires just egg yolk, freeze the white in a bag, and thaw it and allow to come to room temperature before making this.
1)Add a pinch of salt to 4 egg whites and whisk on high until soft peaks form, meaning when the whisk is lifted out a peak remains but it flops on itself. You can use salt and lemon juice or cream of tartar which you can get in little sachets free in magazines, how satisfying is that? When the egg whites are that stiff, add 100g light brown sugar and 120g caster mixed together, about a quarter at a time, low speed at first, and then when all the sugar is mixed in, whip to high until the meringue holds in stiff peaks. If you're brave, hold the meringue over your head, it shouldn't budge.
2)Slurry (what a fantastic word, right?) 2 tsp cornflour and 1 tsp red or white wine vinegar together, and because I'm topping the pavlova with forest fruits, a small pinch of cinnamon and vanilla extract. Fold it into the meringue well. I won't always add cinnamon, but a slightly darker meringue, the lightest brown (I don't mean the colour of smutty lingerie) and the caramel flavour courtesy of brown sugar is exquisite.
3)Use the folding spoon to dab tiny bits of meringue on the corner of the baking sheet, a tip I learned from Lorraine Pascale when she was making macarons, I believe. This will ensure the baking parchment doesn't shuffle. Dollop the meringue on top, and level it to a very smooth, flat circle. You can draw a circle on the parchment so the pavlova is perfectly round, but who in their right mind wants to spend their time doing that?
4)Place the meringue into a hot 180 degree oven, then shut the door and turn the heat down immediately to 150. Leave for 30 minutes, then turn down to 120 and cook for 45 minutes. If your oven doesn't adjust temperature very quickly or accurately, you may have better luck putting the pav in at 120 for two hours.
5)Leave the meringue to cool completely in the oven before opening it. You can do this overnight.
6)For the fruit, Stephanie often uses passion fruit which are much more plentiful in blue Australia, but not grey Britain. In New Zealand, kiwis are often used, the flavour I love but the colour doesn't go with anything. I use berries and a dash of creme de cassis. Coat 500g frozen berries in 3 tbsp caster sugar, then heat them on high for about 5 minutes, until when you draw a finger down the back of the wooden spoon drenched in the juice, the line remains. Leave to cool completely before adding 200g fresh raspberries and a generous few tbsp cassis.
7)Don't dress the dessert long before you serve it- whip 500ml double cream to very soft peaks, and set aside whilst you invert the pav. Flip it over onto the serving plate or cake stand and peel off the paper. This works because the chewy marshmallow interior clashes with the smooth cream, and the bottom and sides remain crisp. Swathe the pav with the cream, and then the berry compote, trying to get a bit of central height. Serve to a crowd unafraid of fattening food. Like my dear friend who's namesake is this dessert.
Tuesday, 15 March 2016
Muttar Paneer with Middle-Eastern Chickpea and Celery Salad
My humble father took an Indian cookery course in 1996, belive-it-or-not. I found the document, and looked through the many coffee-coloured, old, crisp pages, dripping with inspiration. After being reminded of a dry cauliflower curry, which I hope to make again, I also found this curry. Along with a lot of concentrated Indian cooking knowledge, I decided to take this odd dish with me.
Muttar paneer is a widely-eaten curry made of spiced peas and a bland, semi-hard cheese called paneer. Like halloumi, it doesn't go gooey, but unlike halloumi it has no flavour, just a vertiginous capacity to absorb it. If you can find it buy it, but it's surprisingly easy to make; I feel very accomplished in life if I make my own cheese.
With all the washing and boiling of rice, and the piles of starch that are eaten but just sit in my stomach as wasted energy, I don't cook it too often. My substitute, this more easterly salad of some of my favourite instant sides, avocado and chickpeas, plus some lovely aniseedy celery and a dressing somewhat reminiscent of a deconstructed hummus, but with lovely sweet cumin seeds. It seems extra work than just putting rice on, but trust me on this. Although, talking of trust, I should mention I haven't passed on a 'tell them I said;' in my entire life. Maybe have rice with this.
1)Boil 4 pints of milk (a perfect use for when you've bought too much and it will go out of date too soon), and then immediately throw in 8 tbsp white wine vinegar, you could use lemon juice, but I found vinegar much more effective. Once the curds separate, don't stir. Pour into a sieve, and very gently stir it to help it drain. When it's fairly dry, dump into a tea towel, squeeze any more liquid out, and press a chopping board on top, then a pan full of water. Leave to sit for a minimum of 15 minutes.
2)Meanwhile, chop two large onions finely, 2 tsp fresh chopped ginger, 4 crushed cloves of garlic and a green chilli, it's worth keeping the seeds in here. When that's all incredibly soft and mushy, add 1 tsp turmeric, 1 tsp paprika and 1 1/2 tsp garam masala. Add 1 tin of chopped tomatoes, plus half of the volume of the swilled out can of water. Let that simmer gently whilst you further prepare the paneer.
3)Heat a large pan of vegetable oil gently, then drop in cubes of the paneer and deep-fry until golden. Drain on kitchen paper.
4)Add 6 ounces frozen peas, and cook until thawed. Add the paneer cubes and cook for a further 2-3 minutes.
5)Coarsley chop two sticks of celery, with their tough strings removed with a vegetable peeler. Also chop an avocado in your hand, by drawing a criss-cross within the skin, then scoop out the cubes.
6)To a drained tin of chickpeas, mix 2 tbsp tahini, the juice of one lemon, a pinch of paprika, about 2 tbsp natural yoghurt and plenty of salt and caraway or cumin (both will give a different effect, though) seeds. The dressing will likely be too thick, so add a few tsp water to thin. Mix in the celery, but keep the avocado undressed on top, bar a little spritz of lemon to stop it browning. Serve this salad with some chopped coriander or mint if you like and the curry.
Subscribe to:
Comments (Atom)