'Roast Chicken And Other Stories' by Simon Hopkinson is one of the loveliest, most informative and useful cook books you may ever read. I flicked through the book and when it came to the saffron chapter I saw this iconic dish- risotto alla Milanese. It is simply risotto tinted with the fabulous colour and musky flavour of saffron.
Hopkinson makes it by precooking the rice all in one, saving us from the boring ladelling of stock one after the other- I sympathise with this highly, and normally make my risotto all in one in the oven, but this method is useful for getting ahead as the rice can be kept cold until needed at its precooked stage.
This makes a lot for just 4, and it is very rich, but that's desirable as there's something magical you can do with the leftovers...
A final note, traditional recipes use bone marrow from any kind of meat, usually beef. If you wanted to you could replace some of the butter in the second stage with it if it's easily accessible at your local butcher.
1)Infuse 2 tsp saffron threads in 1 tbsp hot water. Leave whilst you continue with the rest.
1)Finely chop three small onions, or two larger ones and fry gently in 100g butter in a saucepan suitable for serving (you don't change cooking and serving platforms) until soft and slightly caramelised. This can take a good 15 minutes. Add 400g arborio rice and stir until the rice is coated. If it appears too dry, add more butter. Then, add 600ml strong chicken stock and the saffron and water and stir in. Make about a litre of stock, as you need more later.
2)Bring to a steady boil, then switch off the heat and clamp on a tight lid. Leave, not peaking once, for 30 minutes.
3)After that, the rice will still be hard and dry. Don't panic, from here on in you apply heavy heat and add enough stock so the rice becomes thinner, volcanic even and just tender. You want it more the texture of all dente pasta than rice pudding.
4)Add some more butter and some grated parmesan, or my new discovery pecorino (more creamy and less salty than parmesan) until glossy and just delicious. Serve to an awaiting table.

Tuesday, 31 May 2016
Blue Bearnaise Steak with French Fries
This is pure sophistication, and possibly one of the best meals I've ever cooked. A thin, rare steak crusted with crunchy salt and pepper corns, an elegant buttery sauce to douse everything in, and crunchy chips to stop everything getting too misty-eyed. However, delicious though this is, you are entering restaurant territory at home, and that is always a treacherous area. The main issue with recreating a dish that seems so at home in a posh French restaurant is that you find yourself disappointed with the lack of efficiency and perfection. It feels like this dish should be turned out one after the other, each plate identical and piping hot, but that is near enough impossible to create in your own kitchen. You will have to come to terms with the food being slightly lukewarm (to try and rectify this you can heat the plates in a warm oven before serving) as you need a restaurant kitchen-sized amount of hands to have everything made simultaneously so it all remains hot. This isn't a problem, this is quite a summery dish, and sort of evokes a cooling barbecue, where the delicious juicy steaks leach their heat in the breeze. Talking of steak, the variety you have is up to you- I tend to go fairly basic and have rump, better than sirloin and slightly more tender, but if you feel like being a bit more adventurous have the chewy skirt or muscular filet mignon.
For the chips, I've tried to cut out as much faff as possible by cutting these super finely in the food processor so they don't need twice frying. Thick cut chips require twice frying, once to cook them through and the second to crisp up the outside, these French (or rather Belgian) fries cook much faster so all you need to do is cook them in oil over a low heat, then ramp up the temperature to get them crispy and golden. If you want to forgo the chips do, and just have some good bread alongside.
1)Take about 1 kilo of red skin potatoes, unpeeled, and either chop them very finely yourself or send them through the coarse chopping attachment on a food processor (often called julienne). Pat them dry with kitchen paper then leave them in the fridge whilst you prepare the sauce.
2)Bearnaise is made the same way as hollandaise, but I don't bother to make a vinegar reduction or infuse it with only half a shallot. Simply take 4 egg yolks (freeze the whites in plastic bags) add 1 tbsp dried tarragon, the finely chopped white and light green parts of 3 spring onions, and 2 tbsp white wine vinegar. Take a pan of gently but insistently simmering water and place the bowl containing the egg yolks etc over it. Have on hand a bowl of iced water to dunk the bowl in if the sauce overheats, plus 200g unsalted butter melted and cooled slightly. Whisk just like mayonnaise, starting with a steady tiny flow of butter then slowly up the amount going into the egg yolks when the sauce is hot and stable. If the sauce thickens too fast and looks like it's splitting, throw in more butter to dilute it and bring the temperature down and, just to be safe, dunk in the ice bath briefly. When all the butter is incorporated, take off the heat, and whisk in a little salt and white pepper, to taste. Also bung in a finely chopped bunch of fresh tarragon. Leave to cool.
3)Using a heavy duty frying pan or a wok, heat some vegetable oil (about 2 pints) over the lowest heat, when the oil makes a chip bubble gently, throw a handful in and leave for about 4 minutes, until they seem to curl and feel soft when you take one out to taste. Increase the heat until the chips sizzle fiercely and go golden, then lift out with a chip basket or tongs (I have one of those Asian ladels that look a bit like a rustic, flat colander). Serve in newspaper in a basket, or whatever your heart desires. Continue until all batches are done, then move onto steak.
4)Cover 4 steaks in clingfilm, then bash them with a meat tenderiser until about an inch thick. Cover in good olive oil and coarsely ground salt and pepper.
5)Have a griddle or frying pan smoking hot and ungreased before the meat goes on, then cook the steaks very briefly. I like it so rare it nearly has a pulse and this happens to be called blue, so I cook them for barely 30 seconds a side. Wrap in foil to rest before serving with the chips and sauce.

Saturday, 28 May 2016
New York Pancakes
It has to be said, (sorry England) that America may make the best pancakes of the Earth. More specifically, New York; I was lucky enough to travel to the city that never sleeps in 2012 at Christmas, and of all the meals we had there (of course we sampled many) breakfast was the most delectable- plates stacked unfathomably high with fluffy pancakes, even coming in the trendy red velvet variety and of course not forgetting blueberries and bacon. As a result, I felt it my duty (given that I can't actually successfully make English pancakes) to recreate the puffy pancakes at home.
Haha, now that it comes to actually writing this recipe, I realise all that boastful nostalgia was fairly unnecessary. These pancakes I make so frequently actually have very little to do with New York, the reason that I named them so was because part of their foundation is cream cheese and vanilla and of course I thought of the world famous New York cheesecake. The ending result is a tangy, light and not too sweet concoction and featuring a task that you may not consider morning work- separating eggs.
I promise you, I've tried and tried to make these without including flour, because wouldn't gluten free cheesecake pan cakes be so of the moment? Unfortunately, without the flour these don't have enough structure to cook into cakes, and the whipped egg whites without flour make a nasty scrambled egg texture. I'm sincerely sorry.
I don't often serve with this syrup, instead I like to macerate berries with balsamic vinegar and a tiny bit of sugar until they go into a chunky sauce, perfect for dumping over the cakes. This is achieved very easily with a handful of strawberries that you behead then roughly chop, then allow them to macerate with about 1/4 cap balsamic vinegar and 1/2-1 tsp caster sugar (it depends on the sweetness of the berries). Leave these in a covered bowl before you start making the pancakes so they have time to macerate, and the powers of osmosis will slick the berries in a glossy red glaze. Another option is some sour cherries, thawed frozen ones or ones out of a jar, or do a bit of morning dismemberment and destone and pull apart some shiny fresh cherries by hand. Chop these up with scissors then steep in some vanilla sugar, again before you prepare the pancakes.
1)Stir together 150g cream cheese, with 3 tbsp natural yoghurt or sour cream, 3 tbsp vanilla sugar, 4 tbsp plain flour and three egg yolks.
2)Leave the remaining 3 egg whites in another greaseproof bowl and whisk them very well, by hand because if I can manage it you certainly can, until stiff.
3)Stir about a third of the whites into the cream cheese mixture to lighten it, then fold the rest in until very smooth.
4)Using an ungreased, non stick frying pan, dollop small spoonfuls of the mixture in. Wait until the bubbles around the pancake set, then flip confidently. Give another minute or so on the other side, then do the next batch.
5)Serve with syrup, or the fruits prepared as above.
Tuesday, 24 May 2016
Fish Cakes with Hollandaise Sauce
Delicious though mashed potatoes are, once they cool and enter the fridge they become riddled with some kind of curse. You will never reheat them to their original glory.
However, mashed potatoes are extensively useful as a leftover ingredient. You could make a loaf of hearty German potato bread, or, even better, fish cakes and (admittedly not really using leftovers) fresh hollandaise sauce- easier than you think.
1)There's no point providing a measurement for the mashed potato as they're leftover, but think about 2 cans for every 2 servings of mashed potato, which requires one egg to bind (so you can't use much less of either fish or potato) I use cat food heaven in the form of tinned salmon, but tuna would also be good. To help the mashed potato come back to life if you're just using plain old boiled potatoes then add a little melted butter and milk. To the mash and fish, season with plenty of salt and pepper, and add the zest of half a lemon, 2 finely chopped spring onions, a pinch of chilli powder (optional), 2 tbsp finely chopped parsley and about 2 tbsp capers. To work as a binding agent, add one egg. The mixture should be soft and sticky but you still need to be able to form it into patties.
2)(you guessed it) form the mixture into fairly small patties and leave in the fridge to firm up before cooking on a baking sheet that you lined with clingfilm before you started. I should tell you that I nearly always make 5 out of these for some reason, but this of course depends on how big you make them.
3)This is a good time to start the hollandaise. It sounds like a nightmarish task, cooking egg yolks over a pan of simmering water, and yes, I can't promise it will never curdle, but I can promise that provided you're vigilant, have an insistent but gentle heat under the eggs and prepare for overcooking by having a bowl of iced water beside for dipping, then your hollandaise will work. And if it still doesn't, then quietly discard it and have the fish cakes with ketchup- no one has to know. The worst thing you can do is attempt this fearfully; that's condemning the sauce to curdle before you begin. You need to start by infusing 2 tbsp white wine vinegar with some cheat shortcuts. Traditionally, mace is used which is, I suppose, the shell of nutmeg; I can't get hold of it, so I use the old leavings of a nutmeg when they're too small to continue grating. Place it in a small pan with the vinegar, a few peppercorns, a bruised spring onion and a bay leaf. Heat gently until slightly reduced, then transfer to a heatproof bowl that contains 3 egg yolks (freeze the whites in a bag for meringue etc). Melt and cool 150g unsalted butter and transfer to a jug. Place the bowl over a pan of gently simmering water, but don't let the water touch the base of the bowl and start pouring the butter into the egg yolks, whisking constantly with a very slow stream just like mayonnaise. When most of it has been absorbed you can pour in the butter with a less delicate wrist. If the mixture splits, you may find upping the heat can help everything emulsify again, or it's too hot and needs to be dipped into a bowl of iced water. Remove from the heat when fully cooked, then add a very small squeeze of lemon that you zested before and a pinch of salt and white pepper. Set aside to come down to room temperature while you coat and cook the fish cakes.
4)You could use breadcrumbs or, even better, panko for this if you have them on hand, but if not coat the fishcakes in raw polenta. Fry them until crispy in a thin layer of oil to prevent burning. Serve with a crisp salad and the sauce.

Monday, 16 May 2016
Superb Carrot Cake
A very old book of my family's- Fast Cakes by Mary Berry, proved vital in providing the world (all 0.00002% of it that read this blog) with one of the best carrot cakes you may ever make. I know that's a horribly immodest thing to say, but this cake, as subtle and elegant as is it bold and brass, is one of the best things Mary-Berry/adapted America can offer.
To adorn this cake I went very kitsch and made some carrots out of sugar paste dyed green and orange. Just mould them into a carrot shape, add a tuft of green and finish with scored lines. But you definitely needn't bother. Although, since some walnut halves dotted over the cream cheese frosting is slightly less vulgar...
1)Grease a small but tall cake tin with butter and a circle of greaseproof paper, buttering over that too. Preheat the oven to 170 degrees.
2)Grate about 150g worth carrot. Since you don't need to peel them, you just need to weigh them whole and factor in about 15g for the tops and tails. It's best not to do this in a processor as this makes them a little too wet.
3)In a large bowl combine 225g self-raising flour, 2 tsp baking powder, 2 tsp ground cinnamon and a good grate of fresh nutmeg. Mix in the carrots, 3 mashed bananas, 50g walnut pieces (this is the cheap way to buy them, as broken) and 150g soft light brown sugar. Crack a hole in the centre and beat in 2 eggs and 150ml flavourless vegetable oil until smooth. Just before pouring into the tin, loosen the batter with 2 tbsp water from a recently boiled kettle.
3)Bake for about 1 hour, checking at 40 minutes with a skewer that will come out clean once baked. Leave the cake to cool in the tin for about 5 minutes before turning out, flipping out of the tin, removing the paper and setting over a wire rack to cool the right way round.
4)To make a frosting, beat 75g soft butter, soft cream cheese (all at room temperature) and 175g icing sugar together in a bowl until light and fluffy. Using a large palette knife, ice the top of the cake with swirls and peaks. If desired, add some sugar carrots and walnut halves.


 I couldn't decide which one to post so I put them all on :)
Saturday, 14 May 2016
Chocolate-Chip Zucchini Bread
If you feel immediately alienated by the title, then call this courgette loaf cake (zucchini being the charming American name for courgette). If you're further alienated by the addition of a vegetable in a cake, either ignore it's there, or be reminded that vegetation in a cake isn'the unheard of- throughout wartime bakers used their natural sweetness in place of the unavailable sugar and that idea still exists today, granted in a more glamorous fashion, in the form of carrot cake. Finding courgettes rather than carrots odd to be baking with is a result simply of the time.
Essentially, this is just a rehash of my banana bread recipe, the main difference being that chocolate plays a more important role here- the cake is studded with melting nuggets of cocoa instead of sticky sultanas.
1)Preheat the oven to 180 degrees Celsius and grease a loaf tin with butter or vegetable oil and dust generously with sifted cocoa powder.
2)Grate 2 small or about 1 3/4 larger courgettes, and don't hold back, grate the whole thing.
3)Combine 200g plain flour, 1 tsp ground cinnamon, and 1 tsp baking powder and bicarbonate of soda (baking soda).
4)In a larger bowl whisk 2 eggs, 220g light brown sugar together until light and well aerated, then incorporate gradually 120ml flavourless vegetable oil (sunflower, groundnut etc, for example) and 1 tsp vanilla extract or bean paste then finally your courgettes.
5)Fold in the dry ingredients until throughly combined, then add 150g dark chocolate chips. Transfer to the loaf tin and bake for a good 40 minutes- 1 hour until a skewer inserted into the thickest part of the loaf comes out clean. Leave to cool for about 5 minutes in the tin before transferring to a wire rack to cool completely. Although there is plenty to be said for having this hot...
Sunday, 8 May 2016
Amarula Cheesecake
Perhaps I'm getting back into baking. Perhaps not everything I bake from now on will look like it's been dropped from a height. However, even when cake-making was my foremost passion, I'd never, ever, think to bother with baking a cheesecake. The water bath, the surface cracking, the eggs, the weird method of cooling; why not just bung it in the fridge? Well, it's a fair argument, but this wasn't difficult, not at all. With a food processor, a large pan, and a nifty spring form tin, I made a decent baked cheesecake; maybe you could make a great one?
I don't know if you've seen my latest tiramisu recipe, but if you have you will notice the common ingredient- the beguiling South African liqueur called Amarula- it's a sweet cream liqueur, with a slight spicy-cinnamon vibe to it that works divinely in a smooth creamy dessert. I continued the theme from my tiramisu, thereby included toasted Brazil nuts in the buttery biscuit base and a pinch of cinnamon to offer the crumb a mighty sun tan.
If you can't get Amarula, you may substitute Bailey's but Amarula is the only cream liqueur Bailey's has outsold and is thus very accessible, and oddly cheap.
1)Preheat the oven to 200 degrees Celsius.
2)In a dry frying pan (you may as well use the tin you cook the cheesecake in its water bath in) toast 100g chopped Brazil Nuts until golden and aromatic, then obliterate in a food processor with 250g digestive biscuits and 2 tsp ground cinnamon. Once they're sandy and fine, pour 100g melted unsalted butter down the funnel and continue to mix until the mixture starts clumping. Spread evenly over the base of a spring form tin around 20cm in diameter because I like a wide thin cheesecake not a doorstop thick one but it's up to you.
3)Have everything at room temperature for at least an hour before you begin. Separate 6 eggs, dropping the whites into a glass lined with a freezer bag and (surprise surprise) freeze them for future use. Place in the food processor which has been thoroughly cleaned, along with 625g cream cheese, 150ml sour cream, 225g caster sugar, 20g cornflour, 2 whole eggs, 1 tsp vanilla extract or bean paste and 200ml Amarula liqueur. Blend on low speed until everything is just combined. The objective here is to mix everything thoroughly but not beat in air, obviously some will be beaten in as it's unavoidable but if you airate everything it will rise and crack as it falls again. You could also use a stand mixer (you lucky bastard) but use the paddle attachment, not the whisk and again, low speed. Before filling the tin wrap the tin with tin foil and then clingfilm to ensure no leakage occurs. Pour the liquid batter into the prepared tin and allow it to settle so you can pop any large bubbles with a skewer. Pour the batter in a pan larger than the tin itself, I used my paella pan of course giving you an excuse to make my paella.
4)Place the tin within the pan in the open oven with the drawer out and carefully pour boiling water around the cheesecake about halfway up the tin. Shut the door and turn the heat down to a very low 160 and bake for 45 minutes to an hour until set, but slightly wobbly in the middle. Allow the same principle as a baked custard, such as creme brulee.
5)When cooked, prop the oven door open just a crack with something like oven gloves and leave to cool entirely like that. When cool, leave in the fridge until you're ready to serve.

Wednesday, 4 May 2016
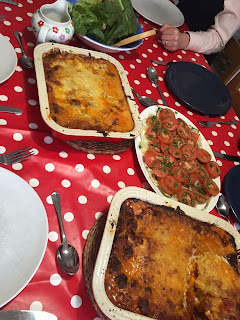
Meatball Lasagne al forno
I'm willing to accept cooking inspiration from anywhere, and this may be my most eclectic so far. First of all, I was watching a very 70s Mary Berry cooking show where she made a delicious lasagne al forno (as it was called back then, it just means lasagne in the oven in Italian) and the recipe was rife with money and time saving tips. I decided to keep many of them as it is so lovely to make such a homespun and retro dish like lasagne- even for a dinner party.
The second trip down YouTube way bought my second variation on the lasagne. I was watching a buzz feed video of Italian women satisfyingly criticising the American-Italian restaurant chain Olive Garden. One woman's review of the lasagne explained that her way included arduous layering and the intruguing idea of small meatballs. I thought this was a lovely little tweak, and adopted for my own. Thank you very much, 'Italian Grandma'.
To serve with this, I make two salads: thinly slice two large white or candy red onions along with 6 medium tomatoes or 4 big beef ones and macerate them in 300ml virgin olive oil, the juice of 1 lemon, salt and finely chopped parsley then arrange on a dish. For the second it's just lettuce with a dressing made on the side (allow guests to serve their own dressing) that's loosely based on a Caeser salad, being garlic infused oil, dijon mustard, Worcestershire sauce and cider vinegar.
Do also note that the meatballs paddling in their rich sauce makes for a great a companion with a steaming bowl of tagliatelle or linguine.
1)Finely chop 3 large white onions and 3 sticks of celery, saute 3/4 in olive oil and set the rest aside for meatballs. Add 6 garlic cloves to that, and an easy way of doing this is putting the whole clove in a garlic crusher, unpeeled and squeezing the juice out one at a a time. Or just blitz all of the above in a processor. When nice and soft, add a good 3 tbsp tomato puree, 1 tbsp oregano, 3 tins of tomatoes remembering to swill them about halfway with water, a beef stock cube, 3 tbsp redcurrant jelly or another sour jam, a pinch or more of dried chilli flakes and a good few shakes of Worcestershire sauce. Let simmer for a good while, tasting, adding salt pepper and sugar until it's right for you, then simmer gently whilst you make the meatballs.
2)Add 1k minced beef to the set aside onions and celery and add lots of salt and pepper, grated parmesan, dried oregano, Worcestershire sauce, 2 eggs and 3 tbsp or so semolina or decent breadcrumbs. Don't be hung up on quantities here, just go by the idea that you need less of everything than you think. Make tiny meatballs out of this, really no bigger than a tsp then plop them gently into the sauce. Vary this mixture how you like, minced lamb works here but you could sprinkle some dried mint in, or use sausage meat and beef or plonk a bit of veal in- generally, if it's minced it's suitable. They only need a short precook. If you have some time that should be spent doing something useful, make more meatballs and freeze them on a tray before transferring to plastic bags, they need no thawing before you plop them in their hot tomato jacuzzi.
3)For the cheese sauce set the milk to heat early as then the whole sauce cooks and thickens faster. However, it may be more runny than you think it needs as I don't precook the lasagne , I use the liquid from the sauce to do it whilst it's in the oven. Heat 2 pints of milk and infuse with a rind of parmesan, if you don't have one just remember to keep them in future and store in the freezer. In the meantime, combine 50g butter and 3 tbsp flour, a pinch of white pepper and mustard powder over low heat and then gradually add the milk and cook until the thickness of single cream, then add a good grate of fresh nutmeg. Stir constantly and have over a low heat. Take off the heat and stir in a mix of really nice cheeses, use predominantly a strong cheddar but for flavour add Swiss cheese and even blue and soft cheese.
4)To assemble the lasagne (this makes two) go for about 4 layers, tomato sauce and meatballs, cheese sauce, raw lasagne sheets and repeat. Top with grated cheese and semolina before leaving to cool, wrapping in foil and leaving in the fridge. You could make this on the night, but, let's be honest, it's quite a chore so it makes sense to do this the day ahead. Either way, bake at 200 for 45 minutes (shorter if you're cooking straight away).

Monday, 2 May 2016
Chocolate Field Mice Cake
Behold, my first successful decorating of a cake. To be honest, I don't know why this bizarre formulation came to me- I imagine it was some combination between my sudden onset admiration for simple and original cake decoration and coming across the chocolate mouse mold I bought when I was about 10. The idea first came to me in the carnation of adorning a chocolate cake with the mice, and then came to me the idea of incorporating cream cheese. Yes, I know what you think- why not just make it a cheesecake? I actually thought far too long and hard about that dilemma- for one, I don't like cheesecake enough to consider adorning it with tempered chocolate (yes, I did even go through the arduous process of tempering the chocolate) and two, I consider a cheesecake (a proper baked one) a thing of simple beauty that when embellished becomes blurred. Therefore, this cake has cream cheese beaten into it and is covered with a thick chocolate cream cheese frosting. After the mice inhabited the cake, they looked rather lonely so to add dimension and a field theme, I added sugar flowers. It was still too 2D, but green peeled pistachios added enough colour and activity to make this cake, if I do say so myself in a fit of excitement, a simple, messy but effective piece.
This cake method is very classic and easy, simply beat butter and sugar, add eggs and fold in dry ingredients. Same with the frosting, an easy cream cheese frosting with melted chocolate incorporated. Probably the two hardest elements are tempering the chocolate although I did find a thermometer-free method on t'Internet and frosting it is easy provided you have the insanely useful large palette knife.
1)Preheat the oven to 170 degrees and ensure it is not on the quick fast cook setting (that mistake has been made many times) and grease 2 sandwich cake tins and line them with just a circle of greaseproof paper. I find lining the sides too just increases the difficulty of removing the cakes, but it's up to you.
2)Briefly combine 165g plain flour, 25g cocoa powder, 1 tsp baking powder, 1/2 tsp bicarbonate of soda and a pinch of salt. No need to sieve.
2)Beat 150g soft unsalted butter or baking margarine and 50g soft cream cheese with 200g caster sugar until light and fluffy. Add 2 eggs, 2 tbsp of the dry ingredients, beat more then add 2 more eggs and 2 more tbsp of dry ingredients. Finally fold in the remaining dry ingredients.
3)To thin the mixture add about 3 tbsp boiling water and fold in thoroughly.
4)Pour into the prepared tins and bake for about 25 minutes, checking at 15.
5)When a skewer inserted in the centre of the cakes comes out clean, the cakes are ready. Leave to cool in the tin for 5 minutes then invert onto a wire rack and peel off the paper.
6)While the cakes are cooling, make the mice. Chop 200g dark chocolate finely then place in a food processor. Blend until it clumps together in a ball (this takes a long time). Break the ball apart with your fingers and continue to blend. It's worth blending at intervals so the motor doesn't get overworked. Whilst blending, fill a glass bowl with boiling water, leave for 5 minutes and pour the water out. When the chocolate looks very smooth and thin, like a ganache, pour it into the bowl and stir. It should now be at around 90 degrees. Pour into your chocolate mouse mold (because everyone has one of those) and leave to set in the fridge.
7)Instead of the utterly laborious and hateful task of sieving 500g icing sugar and 2 tbsp cocoa powder, simply blitz it in the food processor (no need to wash either because a bit of melted chocolate should be fine). In the meantime, set a bowl of 110g good dark chocolate over a pan of simmering water (but the bowl shouldn't touch the water) and melt it. Blend 250g soft cream cheese and 50g soft unsalted butter together, then add the melted chocolate slowly and then very slowly and gradually incorporate the icing sugar and cocoa powder. When smooth and very fluffy, you can ice the cold cakes.
8)Set one cake on the bottom of the stand, and add a generous dollop of icing in the middle, then use a palette knife to spread it all over. Set the other cake on top of that, then dollop the rest of the icing on the top and sides of the cake. Start by using the palette knife to spread the icing evenly, then use it to accentuate peaks and swirls all over. Set the set mice over the top, then in juvenile fashion decorate with sugar flowers and peeled pistachios.

Subscribe to:
Posts (Atom)